Crawling Soft Robot
Pneumatic-Origami Actuated Base with Pneumatic Grippers as Feet
Introduction
Soft robotics show great potential in the areas of medical care, education, service, rescue, exploration, detection, and wearable devices. This is largely due to their inherently high flexibility, good compliance, adaptability and safe interactivity. Specifically, pneumatic and origami actuated robots provide lightweight, high-efficiency, and environmental adaptability. For this specific project, I created a pneumatic-origami actuated base with pneumatic end effector grippers (as the feet to grip on the foot) to actuate in the x,y and z direction. This robot is able to crawl into small crevices and difficult terrain for several of the purposes listed above.
Design
First, I looked at the design of the pneumatic actuated end effectors. I designed the end effectors from online models as well as class knowledge. I initially attempted to create my own chambers for the pneumatic actuators based on estimation and the desired size of our robot.
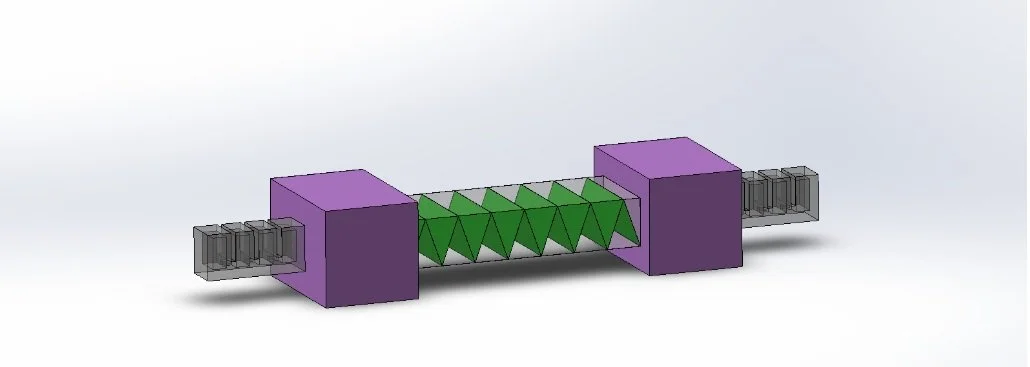
However after manufacturing the first prototypes and looking at other models, I changed the design to include larger chambers with a longer side length and a shorter width of chamber as well as an air channel that goes across all the chambers. Additionally, I increased the size of the origami body in order to match the dimensions of the end effectors. The cross section view of our original design and updated design for the pneumatic feet can be shown below.
Simulation
I decided to only simulate the finger end effectors in Abaqus because these are the critical functioning pieces to our robot actuation and simulating the origami body would add much more complexity than necessary. Instead, I prototyped and quickly fabricated and tested multiple iterations of the vacuumed origami body. For the finger, though, we treated the part as a pressurized pouch. In the simulation, I assumed that we simply had an Eco-flex base (even though we added paper for stiffness) and that there was no effect due to gravity (since I tested via fabrication that it could overcome this with the paper stiffness and vacuum). I also assumed that the pouch would expand uniformly and that the bending due to the different pockets interacting was minimal.
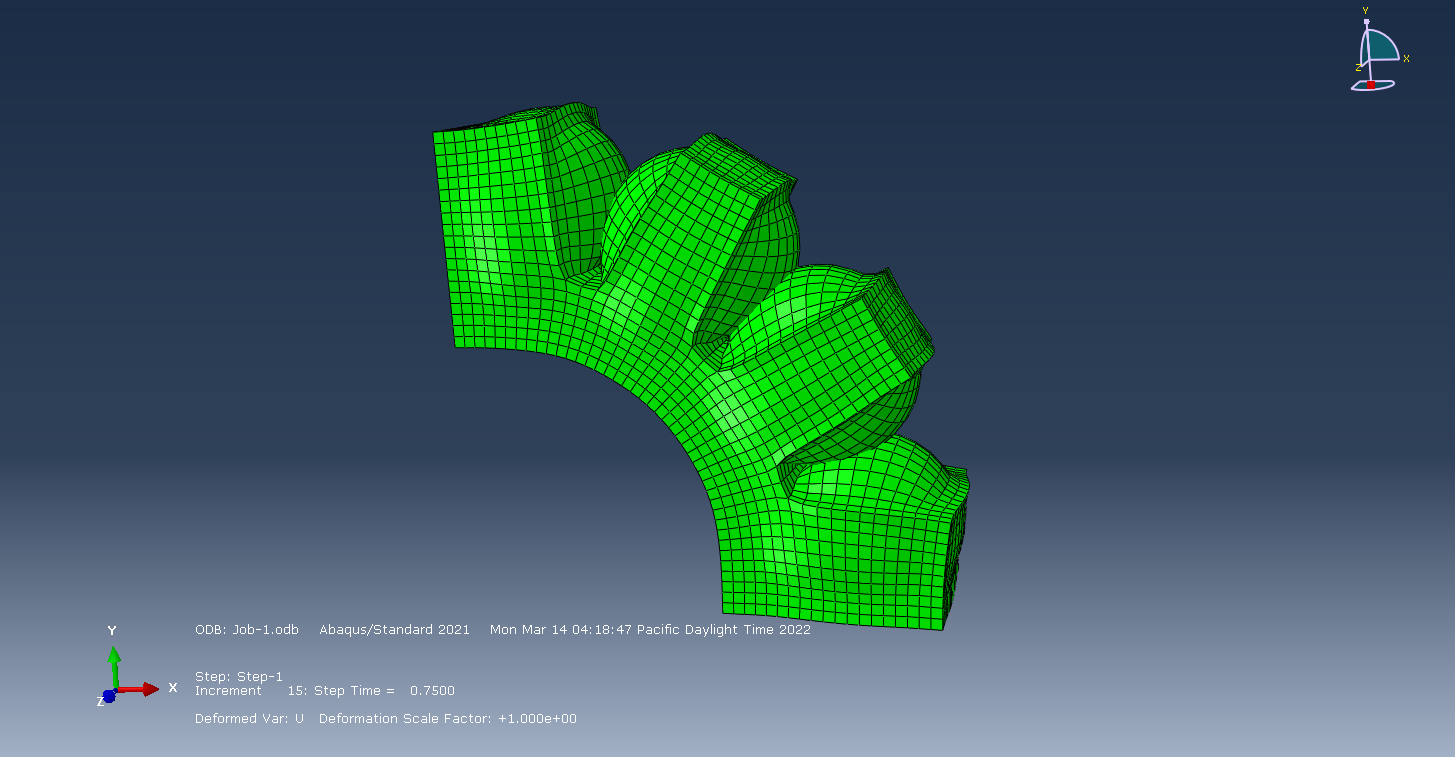
For the simulation, I used Eco-flex material properties with a shear stiffness of 27.6 kPa and infinite bulk modulus. We applied a fixed boundary condition to one side of our finger pouch (the side that would be glued to our foam base) and applied a load of 8 kPa pressure inside all the pouches. This pressure was way over what I expected to need, but decided to use a higher pressure to ensure that the robot could get the 90 degrees of flex needed from the part. Here, you can see images of the Abaqus simulation of the finger end-effectors
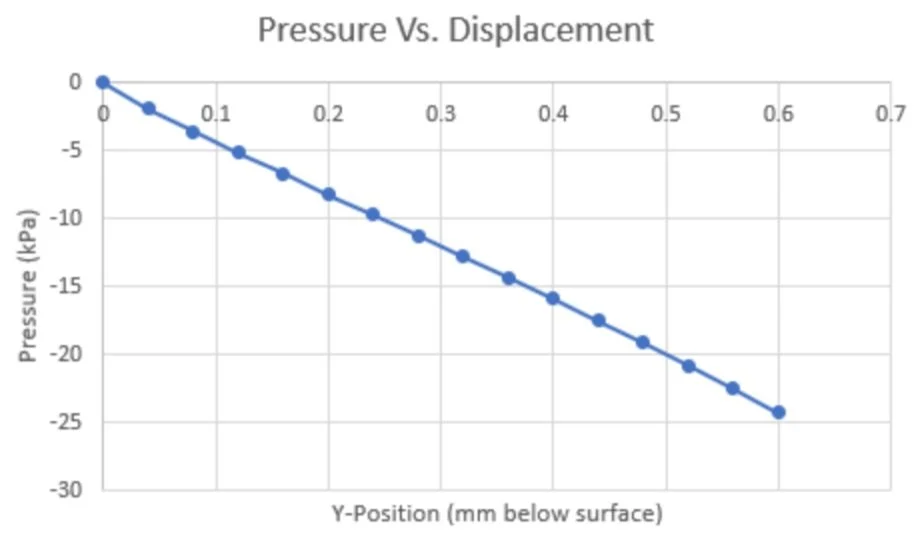
Below, you can see a graph of the displacement from the bottom corner of the end effector to ensure that the 1 cm distance above the surface was enough.
From the graph, I saw a simulated displacement of 2.5 cm which is enough to lift the side of the robot and hold the robot still to the surface. Therefore, I felt comfortable moving forward with the fabrication of the fingers.
Assembly and Final Design
The fabrication of the robot was completed in 3 steps. First, I molded the pneumatic fingers with Eco-flex to create the air pockets that would bend the fingers 90 degrees to grip the ground. Second, I heat-sealed plastic around our simple paper origami structure to create the vacuum actuated accordion origami body structure. Finally, I used adhesive and foam to combine the Eco-flex fingers and the origami body so that the three actuators could combine to create a full crawling system.
For the pneumatic fingers, I started by taking the CAD model of the Eco-flex finger and fabricating the negative molds of the pockets. These were 3D printed in ABS plastic. I created one mold for the pockets of the pneumatic fingers, and a second mold for the base of the fingers. Each of the molds were filled with Eco-flex and cured separately in the oven. For the base, I also embedded a strip of paper in the Eco-flex to add stiffness and keep the fingers from drooping due to gravity. Once these cured, a thin layer of Eco-flex was added to the base in order to properly bond the pockets to the base. This created fully sealed air pockets that can expand with air.
For the body, creating the origami accordion structure was simple, as it was a strip of paper folded back and forth. Then, I attached both sides of the origami structure to opposite ends of the vacuum sealed bag. However, I struggled to find an adhesive that worked well so I a paper clipped the bag around the end of the paper strip. This worked very well, despite not being a very clean solution.
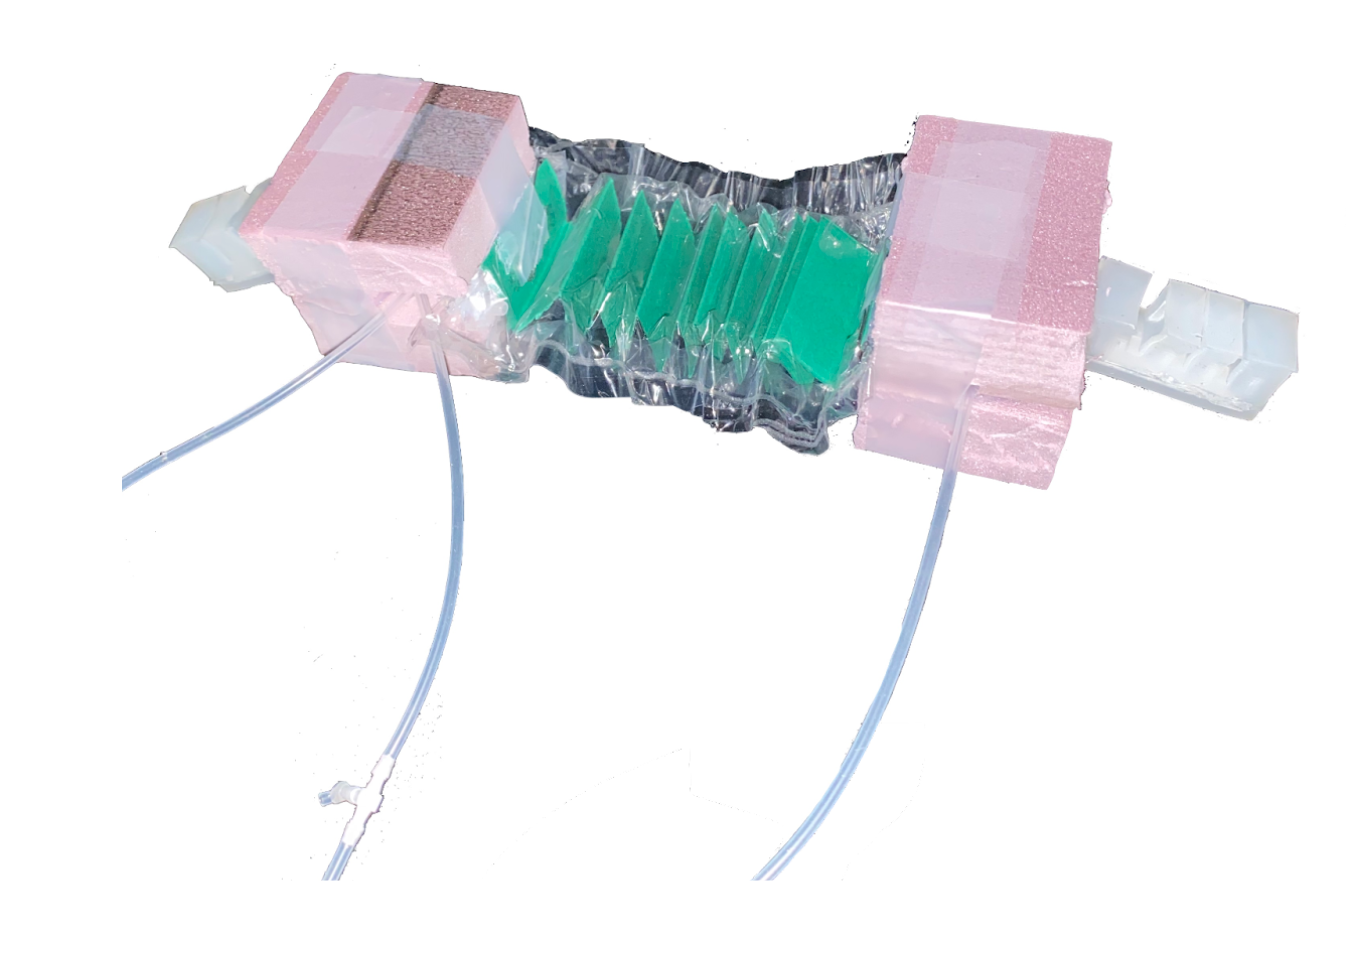
For the overall assembly, I used pieces of foam as the base for each side of our robot, serving as the connection point between the body and the finger end-effectors. I sandwiched two pieces of foam together (on each side) and ran the pneumatic tubes through the bases. One side of the finger end effector is glued to the side of the foam about 1cm above the surface and left cantilevered. The body is also glued to each of the foam bases on each side. A picture of the final assembled robot is shown below.
Actuation
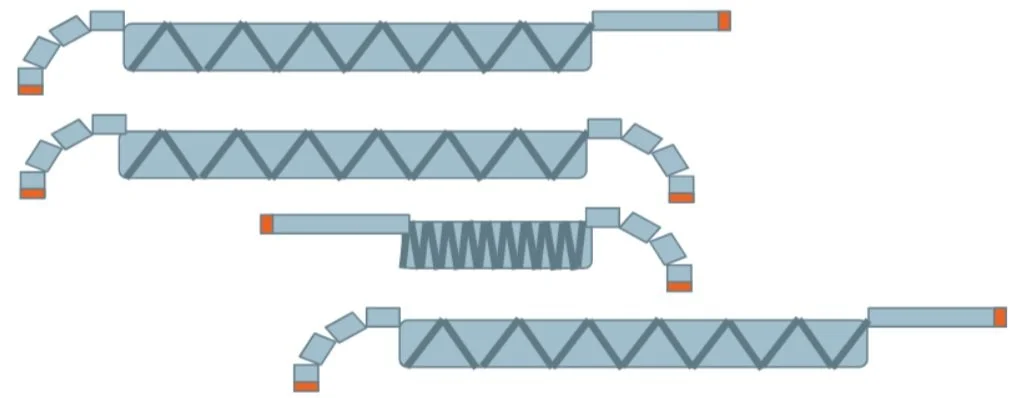
The actuation of our crawling robot is driven with pneumatic pressure actuation from the end effectors and pneumatic-origami actuation from the main body. These end effectors mimic finger/feet like movement by bending and grounding the rubbery end to a certain terrain and pulling the rest of the body to the desired location. Each end effector will have its own actuation pump, and the origami body has a separate pressure actuation pump. Below is an illustration of how the robot moves. The robot begins by applying positive pressure to the end effector in the desired direction of motion in order to grasp the terrain. The end effector on the opposing end is then lifted off the terrain by vacuuming. The origami body is then vacuumed in order to compress in the direction of motion. The end effector on the opposing side is then pneumatically actuated to grasp the terrain again while the other end effector is then lifted. The origami body expands in order to push forward and the entire pattern continuously repeats until arriving at the desired location. This actuation is demonstrated in the diagram below.
Demonstration Video
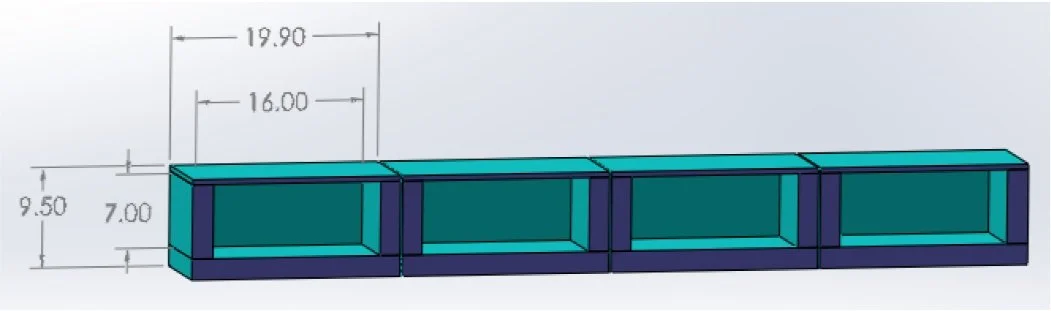
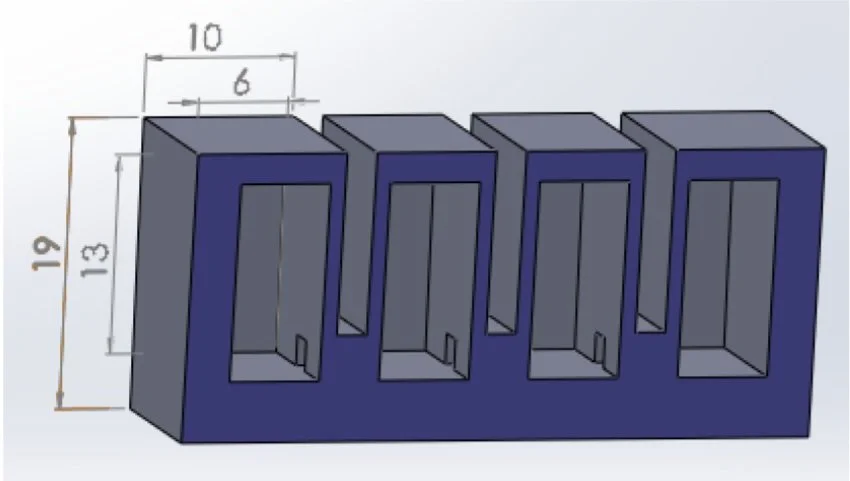
Cross Section of First Prototype
Cross Section of Final Prototype
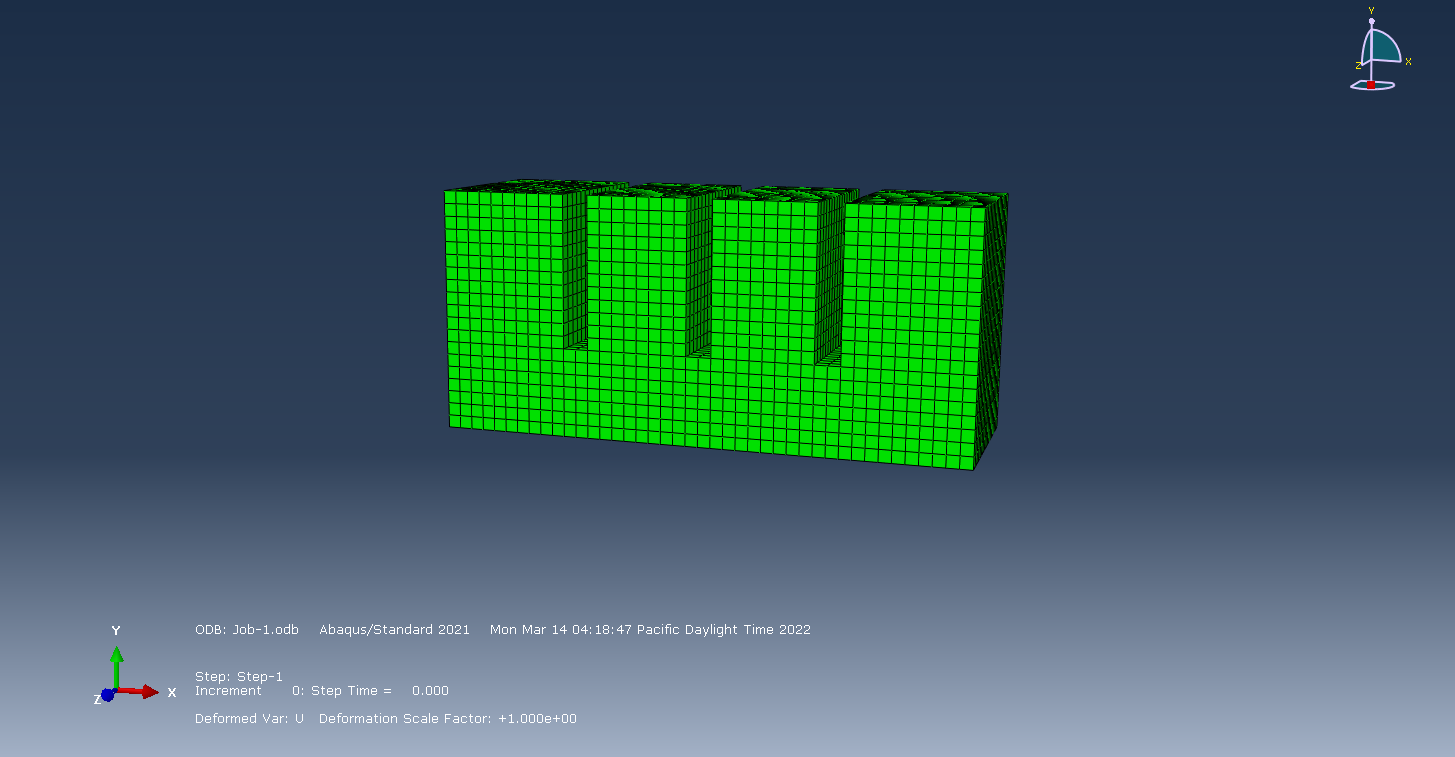
Unactuated Finger at 0KPa
Actuated Finger at 60KPa